
How to Take an EEG
iSyncWave + iSyncBrain User Guide
Taking EEGs with the iSyncWave
This document has the instructions for how to use your iSyncWave device to do an EEG recording. It will also include tips and troubleshooting advice for using your Helmet to its fullest capabilities. Feel free to share and distribute this manual at your discretion.
For instructions on running a PBM session check out the iSyncWave PBM Manual
For instructions on navigating iSyncBrain online check out the iSyncBrain Manual.
Watch: How to Take an EEG
Preparing the device and the patient
1
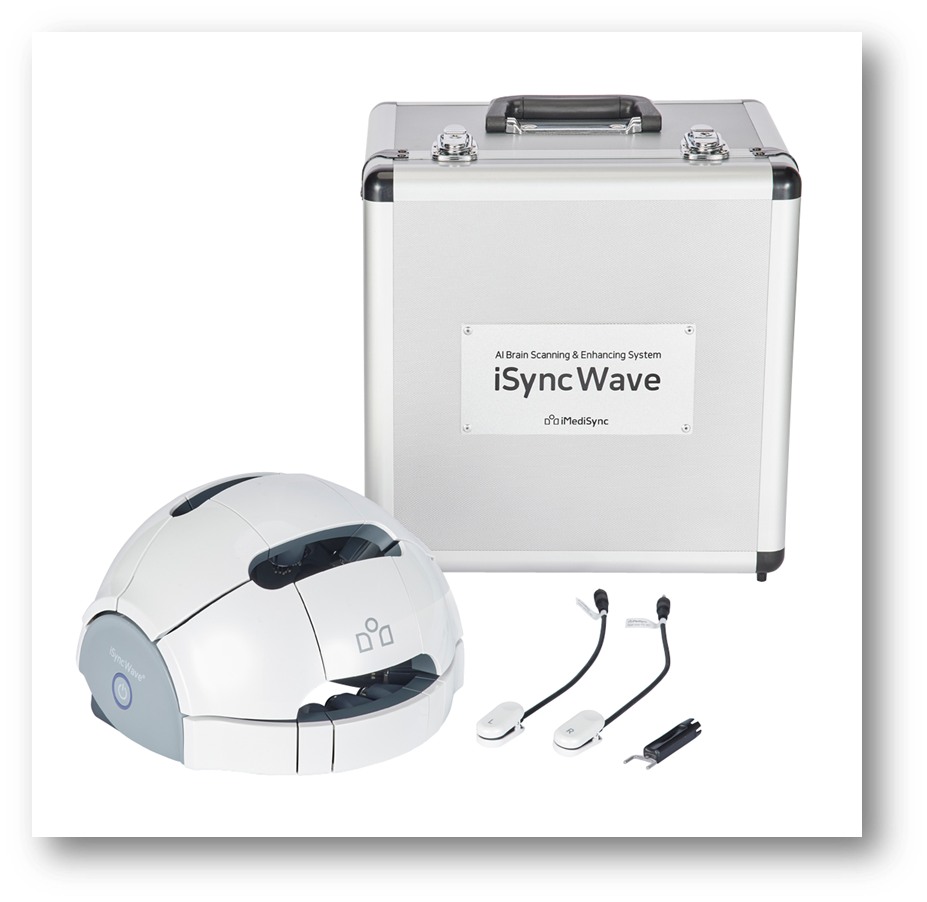
Remove the device and the ear clips from the box. Plug in the earclips. Make sure the clips are completely plugged in. NOTE: The left and right earclips are labeled L and R so you know which is which. They also have different sized plugs so they will only fit in their respective ports.
2
Turn on the helmet by pressing the on button on the right side of the device. It should light up blue when pressed
3
The patient should be seated in a comfortable and calm environment. They should not be too close to any outlets or be sitting in a chair plugged into an outlet. There should be no foot traffic around where the patient is seated.
4
The patient should remove any jewelry, glasses, or hair pieces on their head before starting the recording. Any sort of metal near the recording sites may act as an antenna picking up artifact signals from the environment
5
If the patient has long hair you should do your best to part it down the middle.
6
Apply a small amount of NuPrep to a wet wipe. Use this wet wipe to wipe the patient's forehead and the back of the patient's ears lobes. This is to remove oils or dead skin from the areas most critical to the device getting a good recording.
7
Use a second wet wipe (or the back of the first) to wipe away any NuPrep residue from the forehead and earlobes.
Putting on the helmet
1
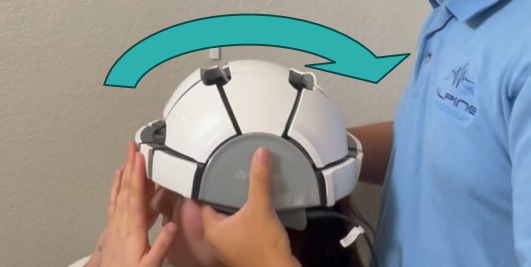
After the patient is completely prepped, you should put on the helmet. It is recommended to do this by A) Holding the helmet by the sides. B) Placing the helmet on the forehead (Note; The front of the helmet is the side with the logo. It also has the flat electrodes which are flat because they go on the forehead.) C). Pulling the helmet apart, back and down to encompass the entire head.
2
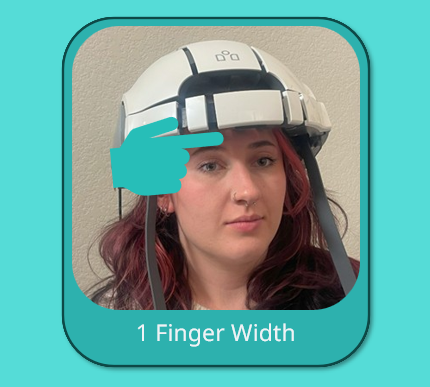
Check if the placement of the helmet is correct. If it is not correct it is best to fully remove the helmet and try again.
- There should be 1 finger width (1cm) between the patients brow and the front of the device
- It should be parallel to the patient's eyes (not tilted)
- The top half of the helmet should be expanded for most patients unless they have a small head circumference.
3
Lift and put down each segment of the cap to ensure the electrodes are facing towards the scalp and not bent.
4
Put the earclips on the patient's earlobes. The letters on the earclips should be facing forward.
- If the earclips do not fit on the earlobes, you may put them on the upper part of their ear.
5
Put on the neck strap. It should not be too tight, it is mostly there to keep the helmet still during the recording.
6
Check in with the patient to make sure the helmet is comfortable.
- If their forehead hurts make sure the forehead (flat) electrodes are flat against their forehead and are not tilted.
- If the helmet doesn't feel secure and is hurting their head make sure it has fully expanded over their head. A pillow behind/around their neck may help alleviate the weight.
✓ Correct Positioning
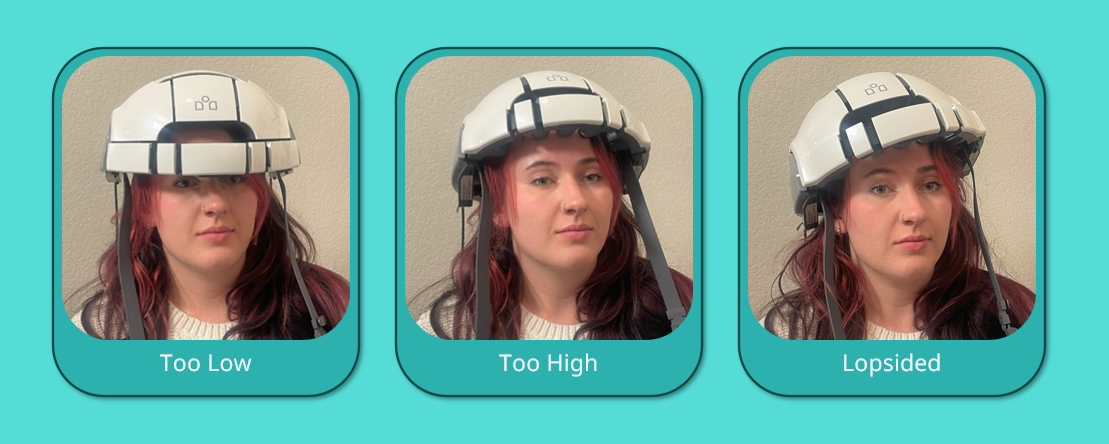
✗ Incorrect Positioning
Navigating the app and doing a recording
1
Open the iSyncWave app on your tablet
- a. The app can be downloaded for free on the google play store.
- b. If it is your first time opening the app, be sure to grant all permissions when prompted. Also be sure to select the proper notch filter for your country.
2
Log in to your iSyncbrain account [The same login you use for the web portal]
3
Press the EEG Measurement button
4
Press either "New" for a new patient, or "Revisitation" for a returning patient
- a. If you are working with a new patient, you will have to fill out the new patient information.
- b. NOTES: We advise to not use any identifying information for the patient's "Chart Number". The age, sex, and handedness are important for accurate analysis. Phone numbers are not used at all, they are simply saved to the patient's account.
5
Next you will see a short video explaining how to prepare the patient for their recording. You can skip this video at any time by pressing the Measurement button.
6
Connect to the helmet via bluetooth. Make sure the helmet is on and near the tablet and then press the bluetooth button. If it does not connect automatically you may have to select the device from the bluetooth menu by pressing "Reinitialization"
7
Once connected, you will see the impedance test. Press the Green Start button to run the 30 second test. After the test you may restart it by pressing the red "Restart" button. Once you are satisfied with your impedances press the green start button to move on.
- a. Each colored dot correlates to each electrode on the helmet. You want them all to be green for an ideal recording.
- b. If you are having trouble getting your impedances to be all green, check the "Getting a good connection" section at the end of this document.

8
Choose your recording settings. In the top right corner of the next screen you may press the gear icon to view the recording settings. In this menu you can select continuous or timed measurement, EC or EO first, and the timing of the measurement (if timed measurement is selected). Press the green Confirm button once you are satisfied with the settings.
9
Press the play button to begin viewing the data. This does not begin the recording, it only displays the data for signal quality.
10
Once you are satisfied with the data quality, you may press the view PPG slider to see the heart rate data being streamed.
11
Once you are satisfied with the EEG and PPG data, tell the patient to relax and open/close their eyes [depending on what part of the recording you are starting with]. Press the red "Record" button at the top right of the screen to begin saving data.
- a. You can pause the recording at any point if you need to make an adjustment to the cap or wait for a distraction to dissipate.
- b. If doing a timed measurement, there will be a small automatic pause in between the eyes opened and eyes closed section.
- c. You can stop the recording at any point by pressing the square "Stop" icon on the screen as long as there is at least 30 seconds of data.
12
Once the recording is complete, you will be asked if you want to analyze the data. Press yes and the results will be available within 10-15 minutes
- a. If you press no you will still be able to analyze the data at a later point.
Removing the helmet and helmet aftercare
1
To remove the helmet, stand behind the patient and hold the helmet firmly on both sides. Move the helmet backward while expanding it, then pull it up and over the front of the head (so that the forehead electrodes are the last part touching the client)
- a. This is the reverse motion as putting on the helmet.
- b. There may be marks on the patient's forehead after a recording. They should go away within a short time.
2
Make sure the helmet is powered off by pressing the power button once if it is still glowing.
3
To clean the helmet and electrodes, apply a small spray of an alcohol+water cleaning solution to a small brush. Gently wipe the brush over each electrode to remove debris.
4
Apply the alcohol+water solution to a small towel and wipe down any other areas of the helmet that may have come in contact with the patient.
5
Remove the earclips from the helmet before storing it back in the included carrying case. Failure to do so may lead to damage.
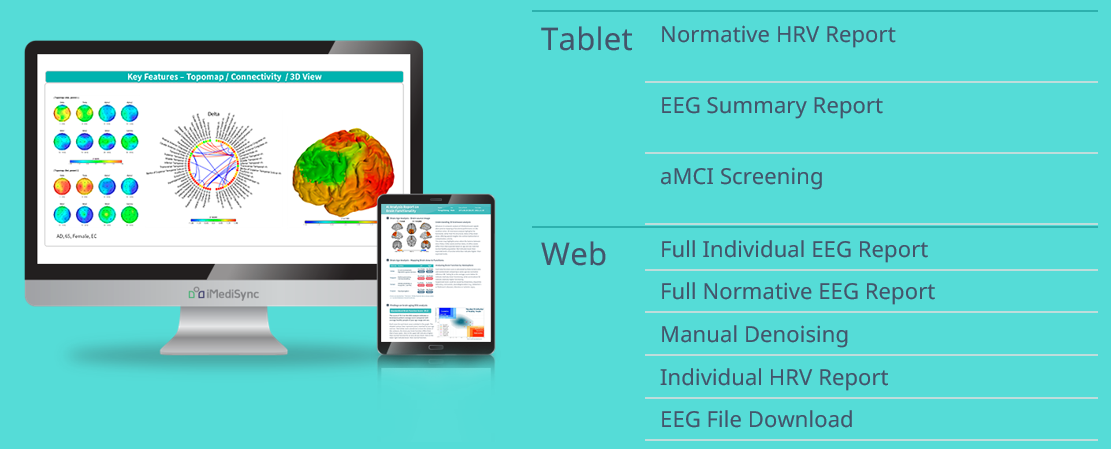
View Your Results — Access EEG summary reports, normative analyses, HRV data, and more from the iSyncBrain tablet app or web platform after every scan.
Ready to elevate your practice?
Experience how easy it is to run clinical-grade EEG recordings with the iSyncWave ecosystem.